Apparently any type of modification on any kind of vehicle is referred to as a Mod (short for modification). Noel and I have done multiple mods on our RV, and here are a few of the more interesting ones!
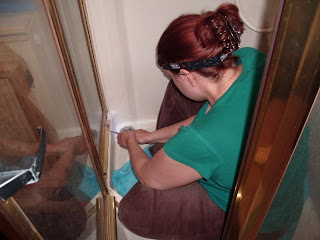
One of the primary tasks of any RV owner (particularly those who buy a used one, like we did) is caulking. This is thrilling stuff, trust me. I didn't get any pictures of Noel caulking the outside seams, but he did snap a few of me sealing the shower, which was leaking badly when we first moved in.
This also gives you a good idea of the size of our shower. Not huge, but perfectly sufficient.

(Please note attractive head lamp - very useful for this kind of work!)
I had to scrape off all the old caulk before putting new down, and there were layers and layers of old caulk (this RV was built in 1992, so the build-up was pretty thick! And also gross.).

We also decided that we needed more freezer space. Our fridge/freezer is a small one, and the freezer is just one of those little boxes inside the fridge - not big enough to hold anything, and also not cold enough to keep anything frozen. Since we never used the chair behind the passenger cockpit chair, we decided to take it out and put in a 4 ft. wide standing freezer (I don't have a picture - use your imagination!). It's been an absolute lifesaver, that freezer! And the little "freezer" in the fridge hasn't gone to waste either - it's now our drink cooler. ;)

Our beloved kitties decided that they hated the three original valances in the bedroom, and took it upon themselves to redecorate in their own particular scratchy way:

NICE. Thank you, kitties, so much. I'm expecting a call from HGTV any day now.
Noel did the reupholstering on the valances with a gorgeous fabric that is more resistant to picks and little evil claws of doom:

Doesn't that look fantastic? He did a wonderful job!
We also didn't like the wallpaper - it's kind of reminiscent of an old Floridian bungalow: pastels in an abstract, vaguely floral design.

We painted the bedroom, and while it was a bit of an improvement, it still looked really boring. So I got a brainstorm one day to paint a celtic knot design! I looked for designs on the internet and figured out how to develop them for wall painting:

And voila!

Isn't this cool? I really like it. This is still an ongoing project. We hope to paint the living room at some point too, since it's got the same icky wallpaper. Noel also painted the little bathroom/toilet closet in a fun light green with a turquoise door. It looks great. I forgot to take a pic of that too. Sorry!
The biggest and best of the mods we've done though is to make the space taken up by the dinette set (which we hardly ever used) a lot more useful and practical. It was hard to get in and out of, and not all that comfortable for sewing or typing. And that amount of space is a valuable commodity when you only have about 230 sq. ft. to live in!
Here's a pic of the dinette set as it was when we moved in:

Noel and his oldest daughter Katie worked on taking the dinette set out, and designing a desk/sewing table. Katie worked very hard and is a pro with the power tools!
Here they're putting it all together:
And here it is after being painted (I painted and reupholstered this chair - a $10 goodwill find):
It opens up the living room so much, and makes writing and typing (and even cooking!) so much easier! Thanks Katie for all your help!
So that's it! A very brief overview of the modifications we've done so far to make this little house our own. Lots more to do (mainly painting and making slipcovers for the living room furniture), but we're very happy with the results so far!


No comments:
Post a Comment